Mod Details
PremiumNo Difficulty


 Mod ID1320
CreditKanapa1
For
 Linkhttps://dev.evilution.co.uk/mod/454-forfour-rear-wiper-motor.htm Copy to Clipboard
Open the tailgate.
To remove the tailgate trim panel, there are 2x Torx20 screws hidden behind ‘caps’… one at each side of the panel. Pop the caps off with a small screwdriver or with your finger nail if you can. Try not to lose them.
Now unscrew the 2x Torx20 screws. Insert your fingers under the lowest edge of the panel nearest the tailgate glass… not the tailgate frame which will be above you. Gently pull the edge of the panel away from the glass and you will find that the panel expansion fittings will un-pop from the tailgate. The other (lower) edge of the grey plastic panel uses ‘tangs’ or blades that slide into openings in the metal tailgate frame…and the panel should now easily slide down and out/away from the tailgate. Place it to one side.

You can see from this picture of the inside of the panel where the 4 white expansion popper panel fixings are…

Here’s where the wiper motor fixes…the shaft of the unit pokes through the rubber grommet that is fitted into the hole in the glass of the tailgate (it is hidden behind that big shiny washer in this picture of a tailgate with the wiper unit removed). A nut is then spun on which acts as the third mounting point for the wiper unit.

As well as the 19mm nut and plastic washer that holds the spindle through the tailgate glass, the unit is held in place by 2x 10mm bolts that go through rubber vibration/compression bushes.

Removing the wiper motor assembly…..
1. Press in the clip on the electrical connector and unplug it from the wiper unit.
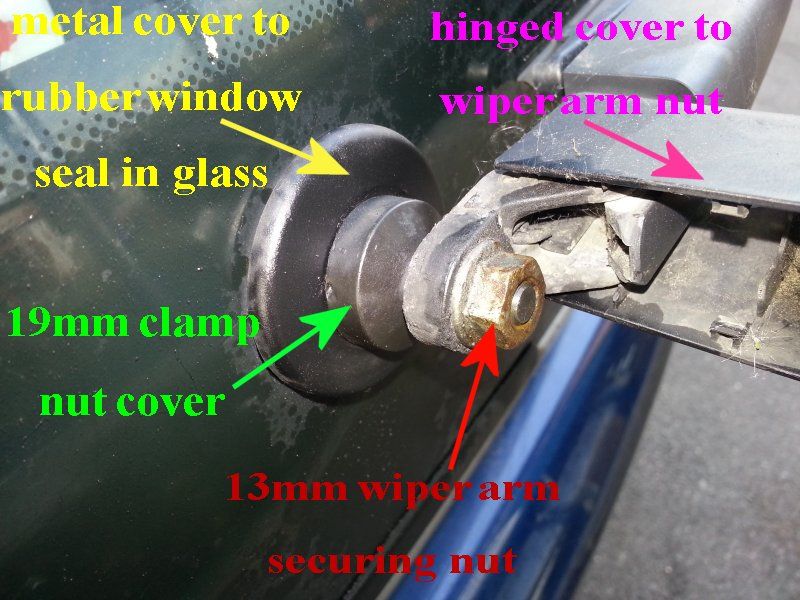
2. Lift up the cover over the rear wiper arm nut and remove the 13mm nut that secures the wiper arm to the wiper unit.
3. Remove the wiper arm…this may possible require a bit of gentle ‘persuasion’….
4. Remove the black cone shaped nut cover from the wiper drive shaft.
It is a close fit over the nut underneath, so prise it up gently.
(There may possibly be a lot of rust,crud, or muck etc in it, clean that all out)
5. Carefully clean all around the 19mm nut that you will now see.
Use a metal suede brush if you have one, or a piece of corse green scouring pad.
When it is clean-ish, spray a very good quality penetrating oil….
(not WD40) all over and around the nut and thread and leave it to
‘soak in’. Repeat this again…later…at least 2 more times.
This all helps to release the 19mm nut. This nut is just about the second hardest part to remove….it may take more than one attempt to remove it…but be very VERY aware….the nut is steel… but the thread it is tightened up on is part of the softer aluminium body of the wiper unit…and they have possibly corroded/bonded electrolytically due to the ingress of water/moisture ! !
And this whole thing is in a glass tailgate!
So…the 19mm nut can either be easily removed, OR…it can be a nightmare. The nut and the wiper unit will either come apart…or….the threaded aluminium body of the wiper unit around the shaft will shatter, crack, or crumble and render the whole wiper unit useless…or…it will be corroded into a solid mass and not come undone at all!


